


Japanese Torihamu... Homemade Deli-Style Chicken "Ham" Lunch Meat. As much as I love deli meats, I've slowly, over the years, switched to buying deli meats that have no preservatives, or nitrites. How I miss bologna:)... But with the change, I've also noticed how expensive preservative-free and minimally processed deli meats can be... almost twice as much. So when I came across a homemade version of chicken "ham" lunch meat, I was really excited!
The Japanese Torihamu was made quite popular in early '01, '02... swept Japan as a favorite for bento lunch boxes. And then the recipe spread all over the internet....interestingly, I hadn't heard of it until recently. However, the idea sparked an interest in me... why not make my own version of deli lunch meat? It would be cheaper... and made by me. Didn't take me long to decide, figured it's always worth a try.
The recipe does require a bit of patience though, you'll need to keep the chicken marinating for about 2 days(48 hours). I started mine in the afternoon, and on the morning of the second day, I took it out to desalinate it. I was so curious, that I didn't wait for the 48 hour mark... more like 40 hours or so. I figured 8 hours wouldn't make such a big difference:).
Before cooking the chicken, I tried a few variations when it came to rolling it up... I found the best method was to simply pound a chicken breast, roll it jelly-style and then tie with kitchen twine. But you can use whatever method works for you.
I loved the torihamu result! My husband said it tasted similar to pastrami.... wondering if it was the seasoning I used? However, I noticed the flavors were even better as the days went by.... so I think it's best eaten after about 1/2 day of chilling time, maybe more? But I'm excited with this new find... it's nice to be able to make my own chicken lunch meat. The nice part is that you can make as little or as much as you need. I'd love to try it with turkey next time. Hope you enjoy....
Note: There are a few recipes for marinating the chicken... some use a bit more sweetener than I have... my version has just a slight sweet taste, similar to the deli meat flavor. But if you prefer, you can add more sweetener ... and even combining sweeteners of choice( ie, sugar, molasses, honey, maple syrup, etc)
Also, there are 2 methods of cooking the chicken, poaching or roasting. I chose to roast mine, so flavors wouldn't leach out in the water and at the same time have the chicken be firmer in texture.
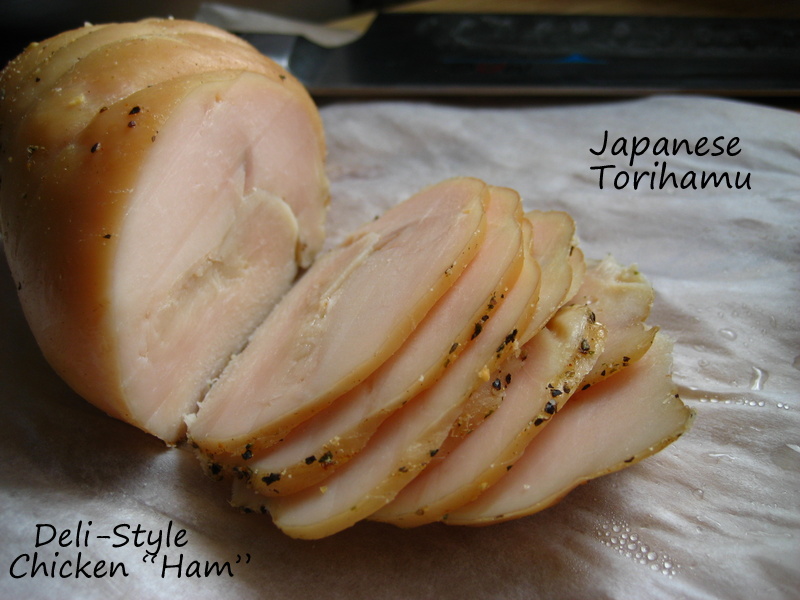
Tip: After cooking the chicken, refrigerate and then slice... it will be a ton easier to slice as the meat firms up. You'll just get a cleaner cut without roughing up the meat. The first photo was cut with a very sharp knife immediately after the chicken was cooked... the second photo is one after the meat had chilled for a couple of hours.
You will need: For every 8 oz. meat, use: 1 1/2 tsps kosher salt + 1 TBS sugar + spices to taste
2 lbs chicken breast meat( I used free-range w/out saline solution)
6 tsps kosher salt
4 TBS maple syrup
1 TBS spices of choice, or to taste*
*I used 21 salute seasoning by Trader's Joe I received as a gift... contains a blend of onion, pepper, celery seed, cayenne, parsley, basil, marjoram, bay leaf, oregano,thyme savory, rosemary, cumin,mustard, coriander, garlic, carrot, orange peel, tomato, lemon juice, lemon oil.
Directions:
1. You will need trim off any fat or sinews from the chicken breasts. Place chicken in a large ziploc bag. Set aside.
2. In a small bowl, combine salt, maple syrup( or whatever sweetner you like), and spices. Mix.
3. Pour the salt mix over the chicken, mix the chicken around so that each chicken piece gets coated with the salt mixture. Seal bag, remove as much of the air as possible.
4. Leave the chicken to marinate in the refrigerator for 48 hours or 2 full days. I left mine for about 40 hours.

5. Remove from fridge, rinse and place in a bowl with plenty of cold water.
6. Soak chicken for 1 hour. This soaking process will get rid of any excess salt(desalinates the chicken), but will still leave enough salt/spices to be nicely flavored.
7. Remove from water and pat dry.
8. Pound each chicken breast lightly to get an even thickness. Roll up the chicken breasts and tie them up with kitchen twine to get a nice round shape.
Bake the chicken.
Oven Method:
- Preheat the oven to 250 °F. I used my toaster oven.
- Line a baking sheet with kitchen cooking parchment or a non-stick baking liner, or lightly oil the sheet.
2. Bake the chicken breasts for about 40-50 minutes, or until cooked through and the surface has a very light brown color.
3. Take the chicken out, remove twine, and allow to cool. Refrigerate, then cut in thin slices. Stores in the fridge for at least a week.
